
I will start off by saying that I am extremely impressed with
this new version of the Monoprice Maker Select Ultimate Printer and I am also
impressed that both the printer and my wife survived the last 50 days.
The printer was incredibly easy to unpack and setup. In fact, I was printing within 30 minutes
after I received it. The only thing I
needed to do was to cut and remove the packing material, remove the accessory
boxes, install the dial and filament spool holder. I also checked to make sure that the rods
were properly lubricated and the belts had the correct tensions. Everything was good to go out of the box. Over
the last 50 days with the number of hours that I have printed I did lubricated
the X, Y and Z axes. For the Z axis, I
used Dupont’s Multi-Use Lubricant with Teflon and for the X
and Y axes I used Dritz sewing machine oil.
I have also been very impressed with how solid and well-built
the printer is. It sports an all-metal
frame which is very solid and sturdy. While the design would not when any
design competitions it is very practical and extremely sturdy. The printer shakes very little when printing
even at high acceleration speeds. The Monoprice Maker Select Ultimate Printer is a rebrand of
the Wanhao Duplicator 6 so any parts that you may need can be obtained from Wanhao. The two images below show the Maker Select Ultimate compared to the Duplicator 6.


The Monoprice Maker Select Ultimate Printer contains a very sizeable print area of 200mm X 200mm X 175mm (7.8in X 7.8in X
6.8in). This compares very favorable to
printers that cost significantly more and will give you plenty of room for most
designs. There is a removable plastic build
surface that covers the bed. Monoprice
also includes a spare build surface with the printer that you can use if the
original one becomes damaged. I have not
used my spare build surface yet because I usually cover the build surface with painter’s
tape when I am printing something but I do believe I will want to soon.
I have found that it is very easy to insert and change the
filament in this printer. This is
another HUGE advantage with how much I print.
When you select the change material option on the printer the hot end
will automatically heat up and eject the filament. Once the filament is ejected, you can then
insert the new filament into the top of the print head and follow the on-screen
instructions as the printer feeds the filament.
You will want to use some of the white tubbing that comes with the
printer to protect the hole that the filament is inserted into. If not you will find that the filament will
wear on the hole and make it bigger.
On the front of the printer are the controls which consist
of a small LED screen and a dial/button.
The controls are very simple to use, all you need to do is turn the dial
to scroll through the on-screen menu and select the option you want by pushing
on the dial. One thing I really dislike
about this printer is the lack of information on the LED screen when it is
printing. On my previous printers, the
LED displayed information like the X/Y/Z position of the print head. This printer just gives you an estimate on
when the print should be completed and a bar that shows the percent
completed. The time estimate is never
accurate because it takes the average print time per layer and calculates the
time remaining based on the number of layers remaining. As you can see in the following image it
shows I had 21 hours remaining for the iPad holder that I was printing however
it only took a little over 8 hours to print the whole thing.

When I first started using the printer it was very quiet. The printer is located in my loft and when
the printer was going I could barely hear it.
Over the 600 hours of printing later, the fans have gotten a bit louder
but they are still quieter than my previous printers. I am thinking about replacing the hotend fan
because it is make a bit of noise when the printer first starts up but then
gets quieter once the printing starts. The fan still works great so I am not in a
rush to replace it but I probably will soon.
This should be a very easy and cheap fix.
The specs for the Monoprice Maker Select Ultimate Printer says it can print up
to 150mm/sec. I have tried higher speeds
but generally I keep the speed around 100mm/sec. This seems to give me a good balance between
excellent print quality and a decent speed.
I do constantly tweak with the print speeds and the following image shows
my current configuration in Cura.

You will notice that the initial layer speed is really low
at 25mm/sec. I was having problems
getting the initial layer somewhat smooth when I used a raft but once I lowered
it to 25mm/sec I started having much better results. I will probably go a little higher for
objects that have a large bottom layer but I would recommend, when using a
raft, to keep it below 35 mm/sec for this printer.
This printer ships with the acceleration speed higher than I
have it set for in Cura however I found that the speed set in Cura to give me a
good balance between speed and quality. I
also found by slowing the acceleration down the printer runs a little quieter
and that makes my wife happier.
In my experience with this printer I found bed stays level
much longer than any other printer that I have used. Over the past 50 days and over 600 print
hours I have only had to level the bed 4 times.
Each time that I have had to level the bed it was because the entire bed
was getting too close to the nozzle on the hot end and I had to lower it a
little. Trust me, with how much I print, not having to level the bed after
every four or five prints is a HUGE benefit of this printer. So while this printer does not come with the
automatic bed leveling feature, don’t worry too much about it because you shouldn’t
need to level it that often.
The specifications say that the Monoprice Maker Select Ultimate Printer can
print at an ultra-high resolution of 20 microns. Printing at this resolution gives incredible quality
prints but it does take much longer to print.
To give an example the block on the left was printer at 100 microns and
took 32 minutes while the block on the right was printed at 20 microns and took
145 minutes. I used the same silver
filament for both prints. While the
printer is capable of printing at the ultra-high resolution, I have used it
very sparingly because of the time it takes to print anything.

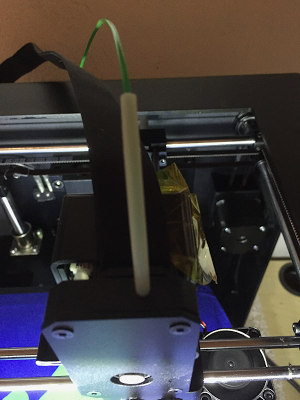
I usually use PLA filament however a couple weeks back I bought
some gold PETG filament. The Monoprice Maker Select Ultimate Printer handled the PETG great. I set the bed temperature
to 80C and the hotend to 245C with the same print speeds as I do with PLA and
the results were great.
With the Monoprice Maker Select Ultimate Printer you can print using
the provided USB cable or from a SD card.
Printing from the SD card is very convenient so your computer is not
tied up while you are printing especially with some of the time-consuming prints.
This printer came with a complete set of tools with almost
everything you need to work on the printer if you have too. It had an extra build surface, a set of hex
wrenches (every size you need for the printer), USB cable, tweezers, scraper,
SD card and a USB to SD card adapter.
I have had two clogs in the last 50 days and had to remove
the nozzle both times to get the clog out.
Removing the hot end is as simple as removing the two set screws shown
in the following image. Once the screws
are removed the hot end slides out. You will
need to be careful not to put too much tension on the wires.

Overall after 50 days and over 600 print hours I am extremely
pleased with the Monoprice Maker Select Ultimate Printer. The speed of the
printer is good and can be controlled within Cura (or whatever slicer you use)
to suit your needs. I do wish the LED display
would give more information while it is printing especially the X/Y/Z locations
of the print head but I have been able to live without it.
The bottom line is the Monoprice Maker Select Ultimate Printer is an outstanding
printer for the money. It is very
reliable and held up perfectly to over 600 hours of printing over the last 50
days with no major issues. The quality
of the prints is outstanding especially if you try printing at 20 microns and
slow the speed down. It doesn’t come
with automatic bed leveling but the bed seems to stay leveled and you should
not have to relevel it too often. I
would absolutely recommend this printer for anyone looking for a reliable, high
quality printer at a very reasonable price.
Here are a few images of some of the items I printed in the last couple of weeks to demonstrate the print quality I get from the Monoprice Maker Select Ultimate Printer:

| 
|

| 
|
Why don't you export and post your cura settings file instead of teasing us with a few screenshots
ReplyDelete